InLattice AP/AR Automation
The simplest way to automate your accounting process
Customer Account Center for QuickBooks Online
Go Beyond Online Invoicing
Provide online access to Customer Invoices and Receive Payments
The process includes registration, one time setup of customer accounts, importing invoices and providing online access to customers.
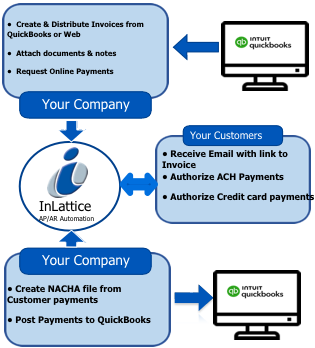
- If you have QuickBooks Online account already, go to step Register with InLattice. Otherwise, register your QuickBooks Online account
- After registration, login to your QuickBooks Online account and create your company.
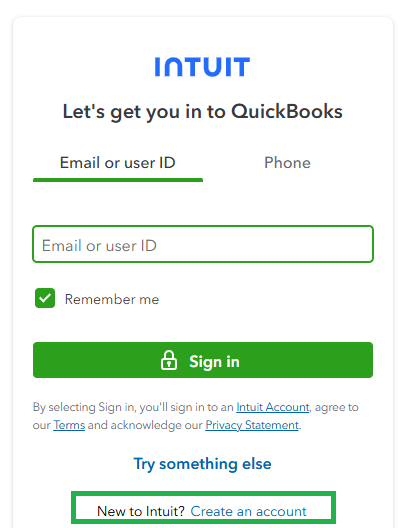
- Add customer and vendor in your QuickBooks Online company.
- Register with InLattice.
- When you login first time to InLattice, the screen shown below gives the option to link your InLattice account with your QuickBooks Online account.
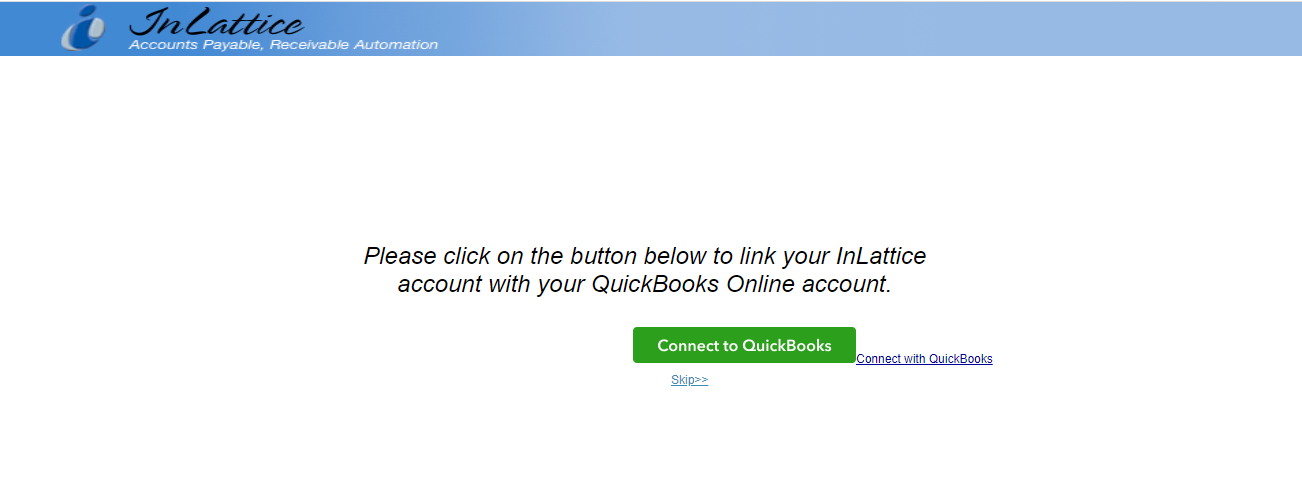
- If you have not logged in to QuickBooks Online account, you will be prompted to login and select the company.
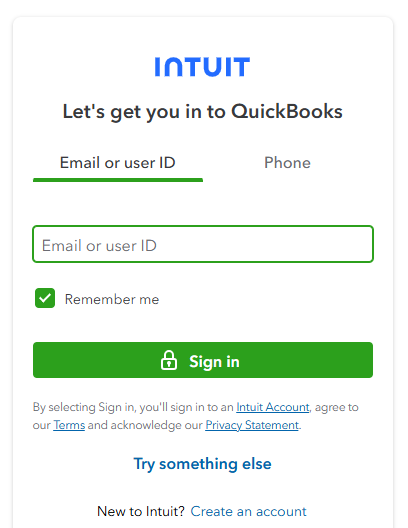
- After successful login, you will be asked to authorize the connection of your QuickBooks Online account with your InLattice account.
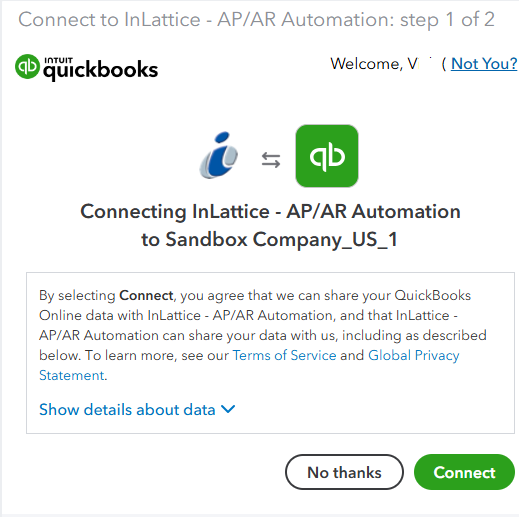
- After authorization, your QuickBooks Online account connection data is saved with Inlattice.
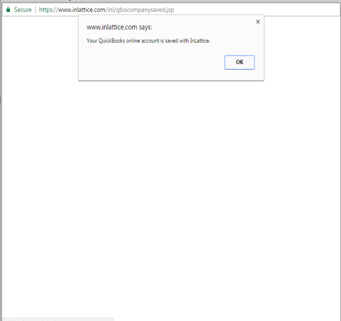
- Click on OK, you will be redirected to your InLattice account
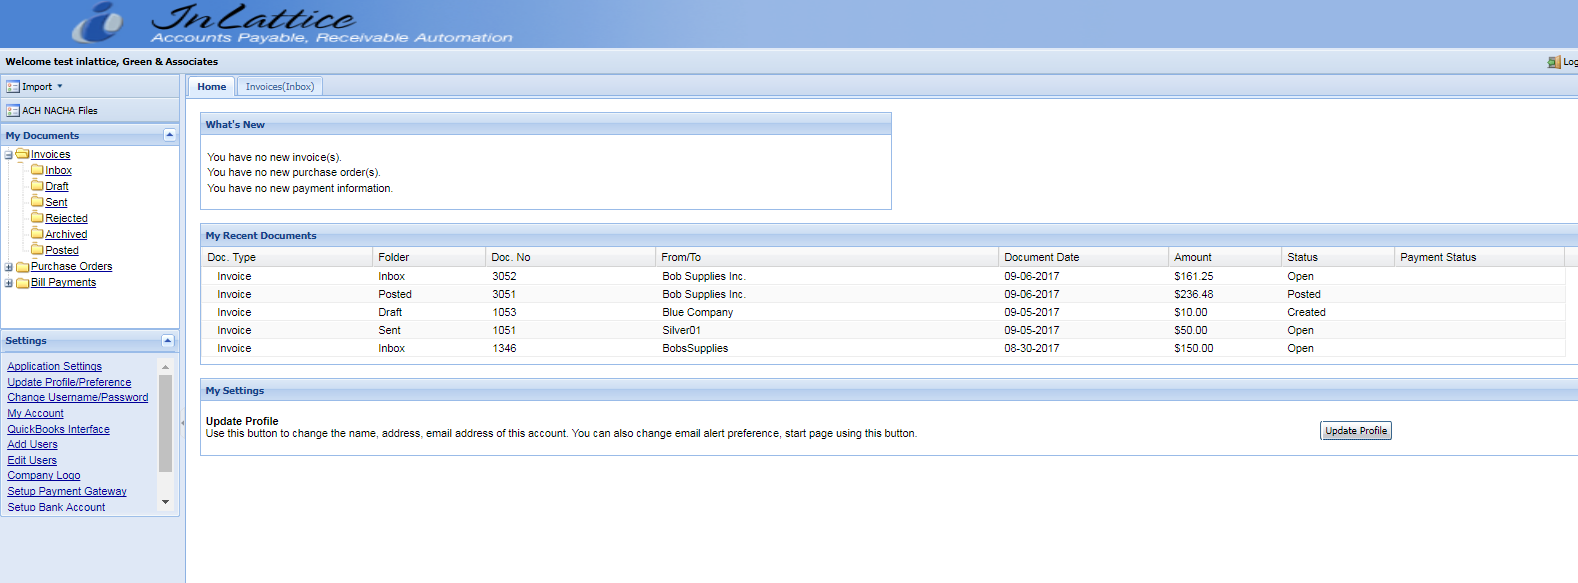
- Upload QuickBooks Customer List – This can be done using InLattice > Settings > QuickBooks Interface > Refresh Customer list option.
- Setup Customer Accounts in InLattice – Go to Settings > Add users to add customer accounts to InLattice. You will receive email notification with customer user id and password. (InLattice Support Team can set up user accounts, after the customer list is uploaded to InLattice)
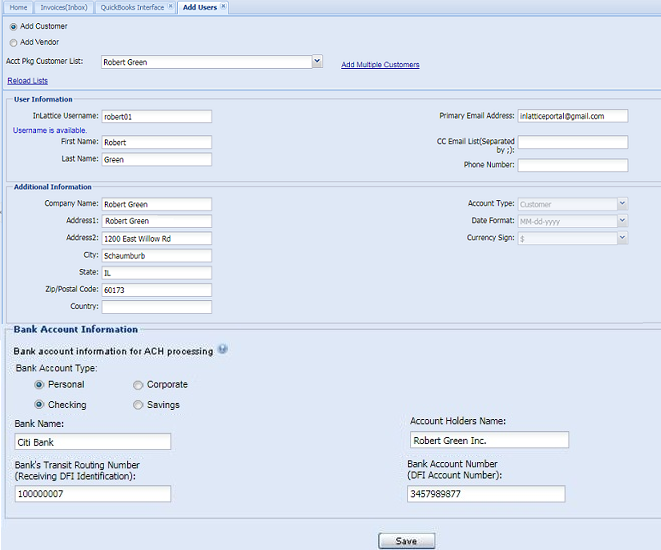
- Enter Invoice Extract Begin Date – Go to Settings > QuickBooks Interface >Enter Invoice Extract Begin Date and enter a date.
- Upload QuickBooks Customer List
- Setup New Customer Accounts in InLattice
- Set Up Customer Bank account info (optional)
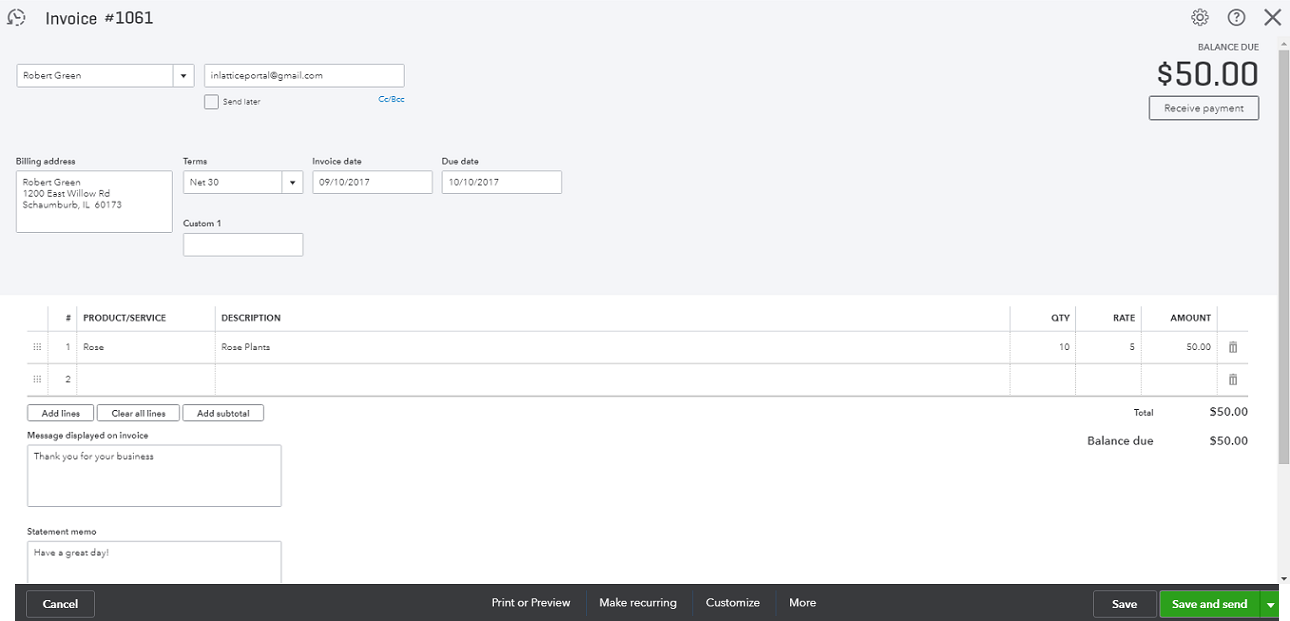
- Create Invoices for the customers in QuickBooks.
- Login to InLattice account
- Click on Import > Invoices
- All invoices created in QuickBooks since last import will be uploaded to InLattice > Invoices > Draft folder. You will be directed to Invoices > Draft folder

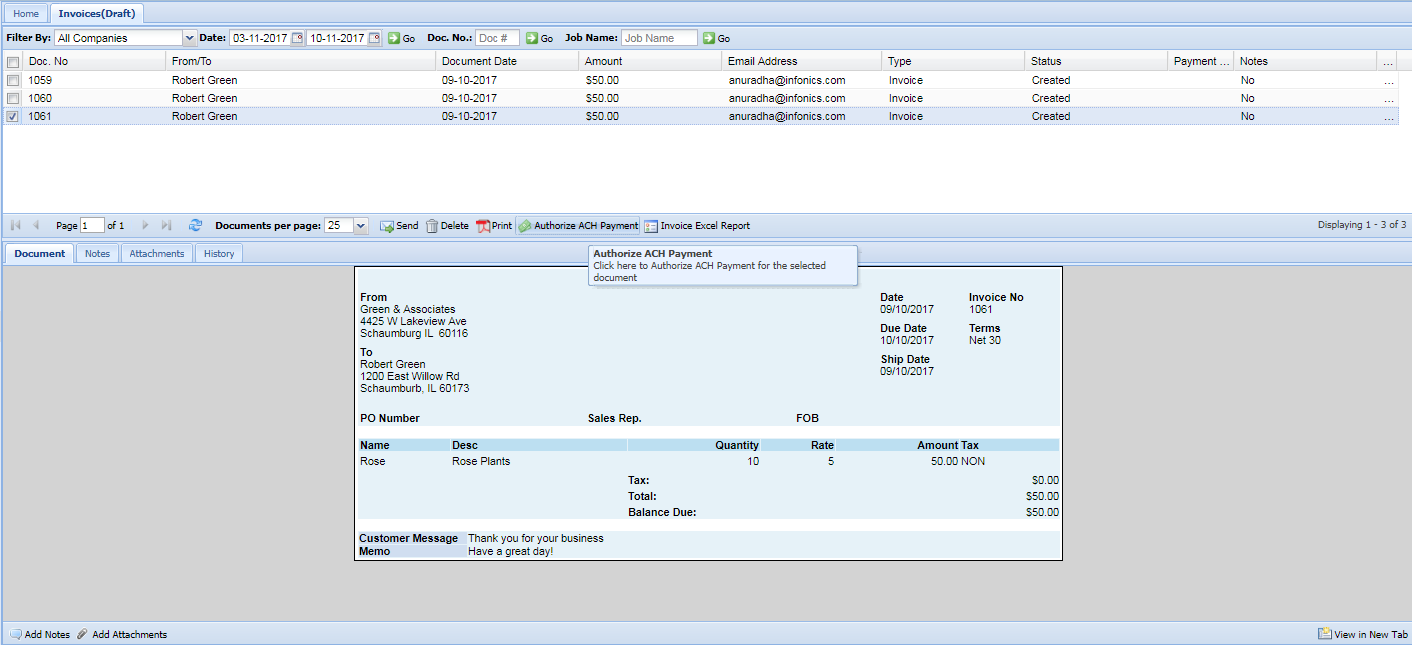
- Attach any supporting documents
- Send the invoices to customer.
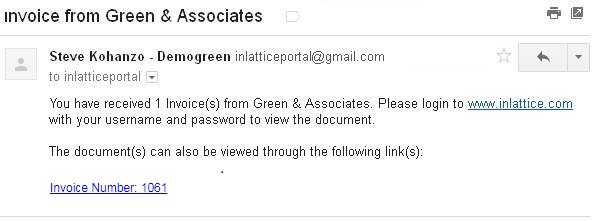
- Customers will get an email notification.
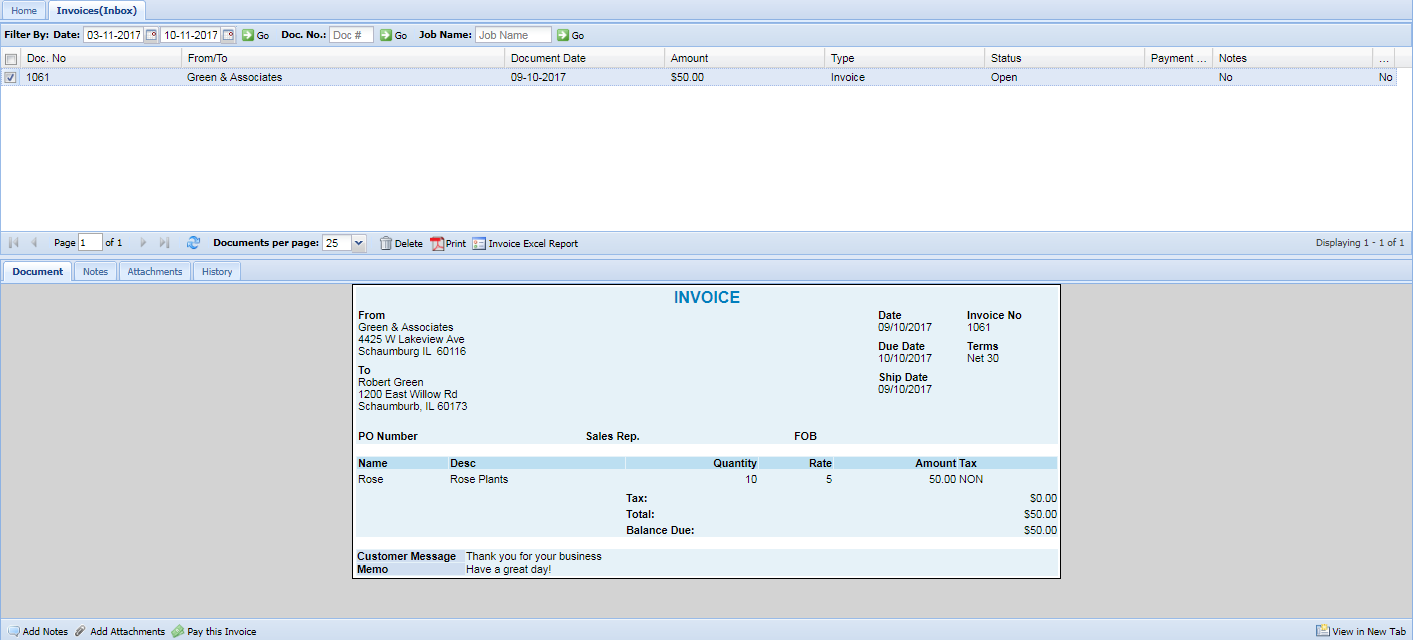
- Customer can click on the link to view the invoices
- Export Payments to QuickBooks. Invoices will be marked as paid, if online payment is enabled.
Customer viewing invoices:
- Customer will receive the email alert
- Customer can click on the email link to view the invoice.
- Also, by logging into the online portal, customer can view all invoices received.
- If online payment option is set up, customer can authorize payments online.
For additional support, please contact us at support@inlattice.com
Customer Payment ACH/NACHA for QuickBooks Online
Get Paid Faster, Easier & Cheaper
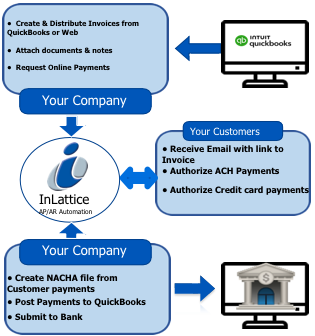
Receive Customer Payments using ACH – NACHA file
InLattice allows you to create NACHA file required for banks to process ACH transactions.
The process includes registration, one time setup of customer accounts with bank information, importing invoices, creating NACHA file and providing online access to customers.The ACH/NACHA file created by InLattice, needs to be submitted by you, to your bank for further processing. Please contact your bank for more information on requirements for processing NACHA file.
- If you have QuickBooks Online account already, go to step Register with InLattice. Otherwise, register your QuickBooks Online account
- After registration, login to your QuickBooks Online account and create your company.


- Add customer and vendor in your QuickBooks Online company.
- Register with InLattice.
- When you login first time to InLattice, the screen shown below gives the option to link your InLattice account with your QuickBooks Online account.

- If you have not logged in to QuickBooks Online account, you will be prompted to login and select the company.

- After successful login, you will be asked to authorize the connection of your QuickBooks Online account with your InLattice account.

- After authorization, your QuickBooks Online account connection data is saved with Inlattice.

- Click on OK, you will be redirected to your InLattice account

- Upload QuickBooks Customer List – This can be done using InLattice > Settings > QuickBooks Interface > Refresh Customer list option.
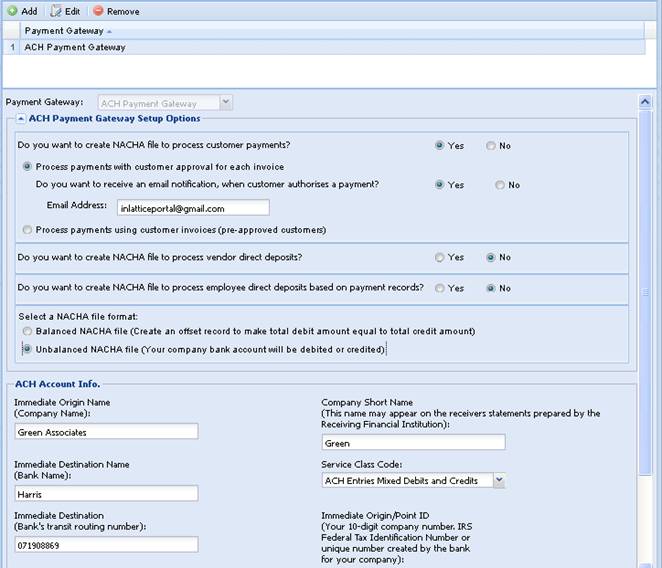
- Set up ACH Payment Gateway Data – You need to have an ACH account with the Bank. This information is entered in Settings > Setup Payment Gateway > Add/Edit ACH Payment gateway option
- You will have the multiple options for creating NACHA file. Select appropriate options
- If you want to maintain (Add/Edit) Customer Banking information, Select Yes in “Do you want to setup customer banking information?” Otherwise for testing purpose, you will be required to login as a customer to enter this information.
- Select Balanced/Unbalanced file option based on your bank’s requirements
- Enter other data provided by the bank.
- Setup Customer Accounts in InLattice – Go to Settings > Add users to add customer accounts to InLattice. Based on your set up, you can also enter customer bank information here. You will receive email notification with customer userid and password. (InLattice Support Team can set up user accounts, after the customer list is uploaded to InLattice)

- Set Up Customer Bank account info – Either you can do as part of step 12 or you need to login to customer account to update this information.
- Enter Invoice Extract Begin Date – Go to Settings > QuickBooks Interface > Enter Invoice Extract Begin Date and enter a date.
Whenever new customers added to QuickBooks,
- Upload QuickBooks Customer List
- Setup New Customer Accounts in InLattice.
- Set Up Customer Bank account info
Use Settings > Application Settings screen to enable/disable various features of InLattice, setup user preference and banners, header images etc.
- Create Invoices for the customers in QuickBooks.

- Login to InLattice account
- Click on Import > Invoices
- All invoices created in QuickBooks since last import will be uploaded to InLattice > Invoices > Draft folder. You will be directed to Invoices > Draft folder


Pre-Approved customers
- You can authorize all payments by selecting all payments in draft folder and clicking on Authorize ACH payment.
With Online Payment Authorization by Customer
- Send the invoices to customer.
- Customers will get an email notification.
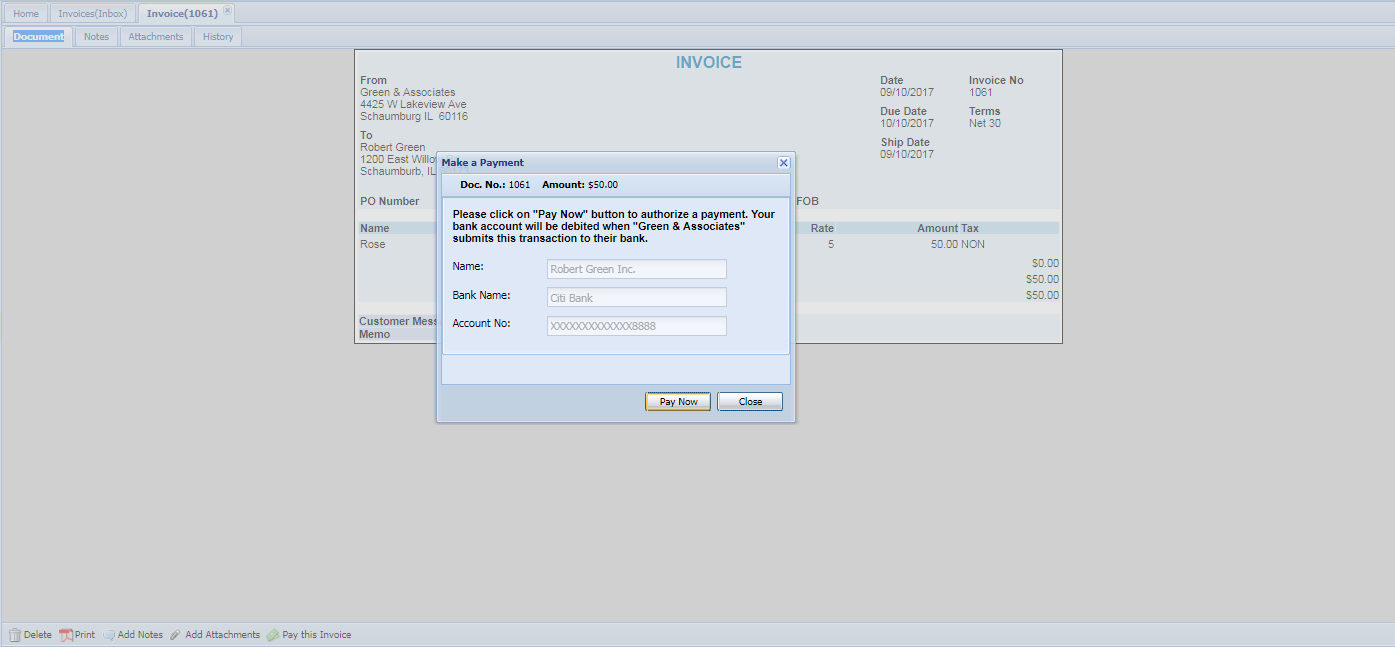
- Customer can click on the link to view the invoice and click on “Pay this invoice” to authorize payments
- When customer makes a payment, you will get an email notification
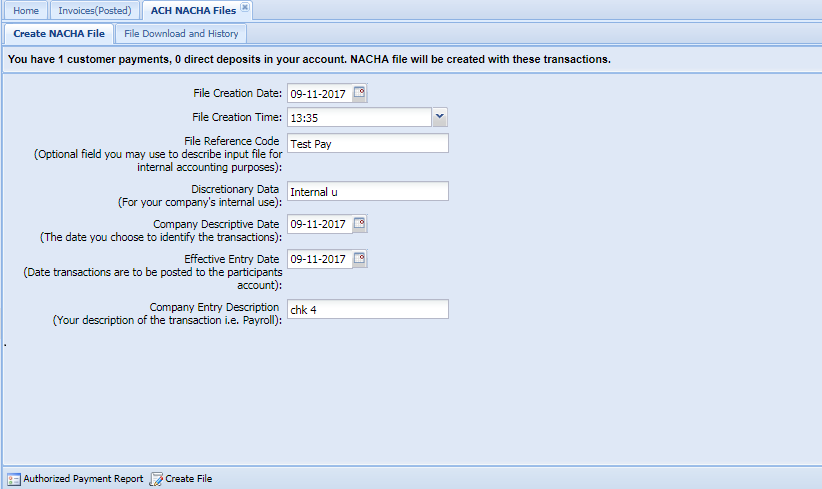
- Click on ACH NACHA file button and click on Create File button. You will be directed to the file download screen. Customers will receive an email notification, informing them about the debit to their account, if email notification option is enabled.

|
- Download the file most recent ACH NACHA file .

- Send the NACHA file to Bank as per your bank’s guidelines.
- Export payments into QuickBooks.
- All paid invoices will be sent to QuickBooks.
For additional support, please contact us at support@inlattice.com
Vendor Portal for QuickBooks Online
Simplify & Streamline Your AP – Eliminate Data Entry
Receive Vendor Invoices and Post it as Bills in QuickBooks
Receive vendor invoices online
Post vendor invoices as Bill to QuickBooks
Online approval option
Attachment, Notes can be added to invoices
Track document history
Simplify & Streamline Your AP – Eliminate Data Entry
Receive Vendor Invoices and Post it as Bills in QuickBooks
The process includes registration, one time setup of vendor accounts, receiving vendor invoices and posting bills to QuickBooks.
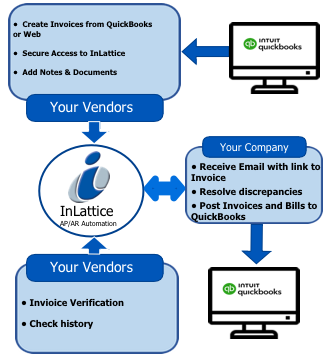
- If you have QuickBooks Online account already, go to step Register with InLattice. Otherwise, register your QuickBooks Online account .
- After registration, login to your QuickBooks Online account and create your company.


- Add customer and vendor in your QuickBooks Online company.
- Register with InLattice.
- When you login first time to InLattice, the screen shown below gives the option to link your InLattice account with your QuickBooks Online account.

- If you have not logged in to QuickBooks Online account, you will be prompted to login and select the company.

- After successful login, you will be asked to authorize the connection of your QuickBooks Online account with your InLattice account.

- After authorization, your QuickBooks Online account connection data is saved with Inlattice.

- Click on OK, you will be redirected to your InLattice account

- Upload QuickBooks Vendor List – This can be done using InLattice > Settings > QuickBooks Interface > Refresh Vendor list option.
- Setup Vendor Accounts in InLattice – Go to Settings > Add users to add vendor accounts to InLattice. Based on your set up, you can also enter vendor bank information here.
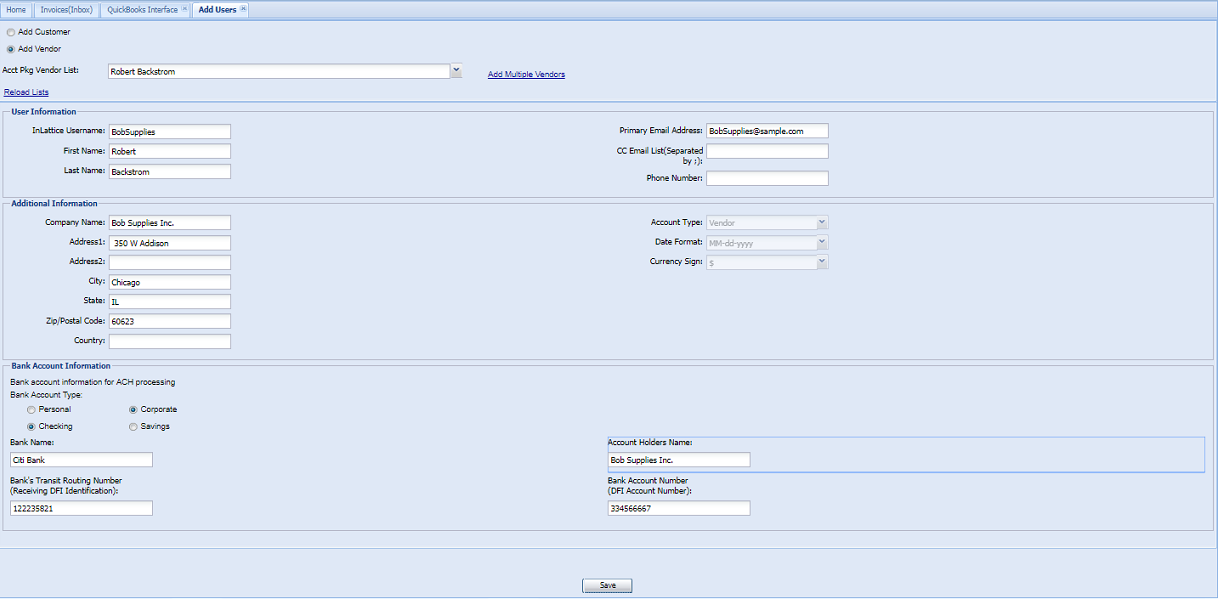 Settings > Add Users > Add Vendors Screen (Bank information is optional)
Whenever new vendors added to QuickBooks,- Upload QuickBooks Vendor List
- Setup New Vendor Accounts in InLattice
- Send Vendor Login information to vendors – You will receive email notification with vendor userid and password. (InLattice Support Team can set up user accounts, after the vendor list is uploaded to InLattice)
If you receive a lot of invoices from Vendors, InLattice can save you quite a bit of time by automating the Bill creation process. As you use InLattice to Post bills from Vendor Invoices, InLattice will learn the mapping that you use from Invoice lines to Bill Lines. Subsequent bills created from same Vendor will be automatically mapped using the previously learned mapping. So, after creating a few bills, new bills can be posted just with a click of a button.
Here’s a quick ‘how to’ Guide
Vendor Creates an Invoice with Rose Plants, Porch Lighting and Patio Lighting as Line Items.
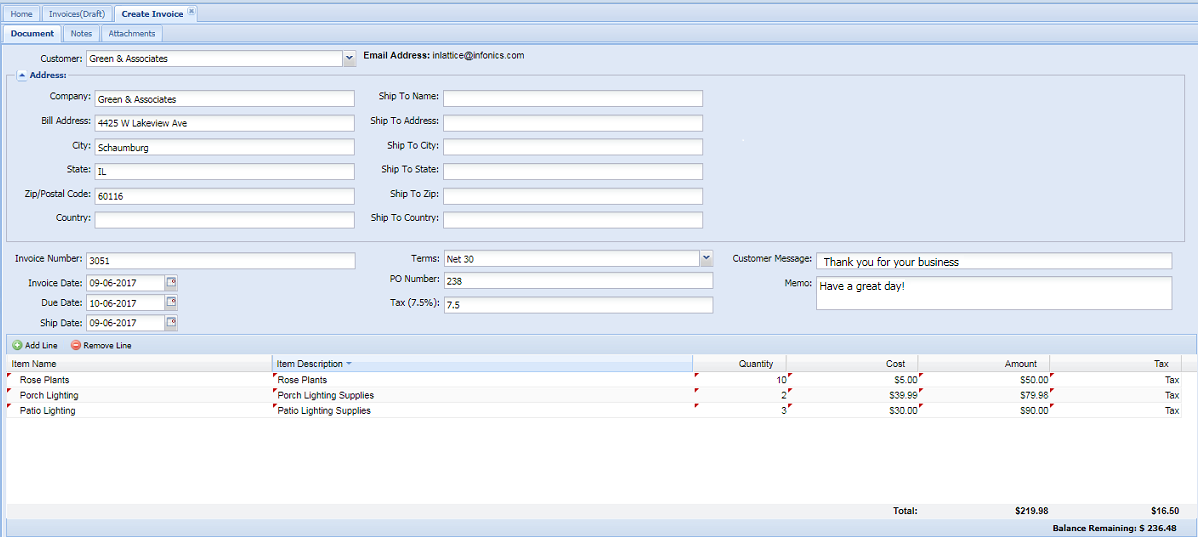
Create Bill – Once this Invoice is received, you will create a Bill, InLattice will automatically map the known items in the Invoice line to Bill Line. Notice that Rose Plants is already mapped however Porch Lighting and Patio Lighting is not mapped since this is the first Invoice from this Vendor using that item.
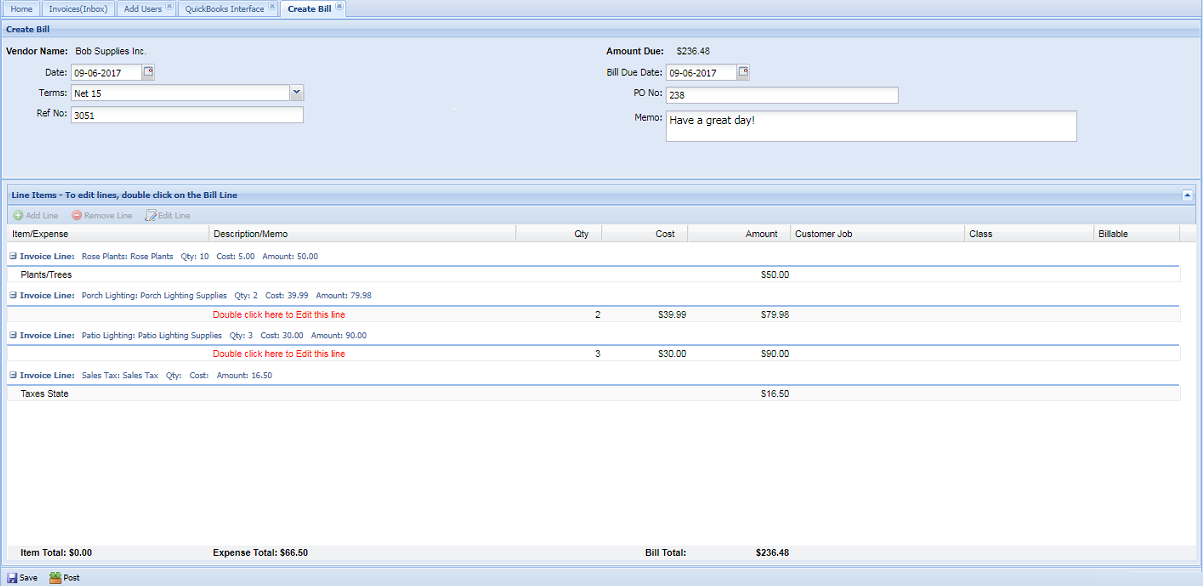 Mapping – You can double clicks on the unmapped Items and manually map them for this Invoice
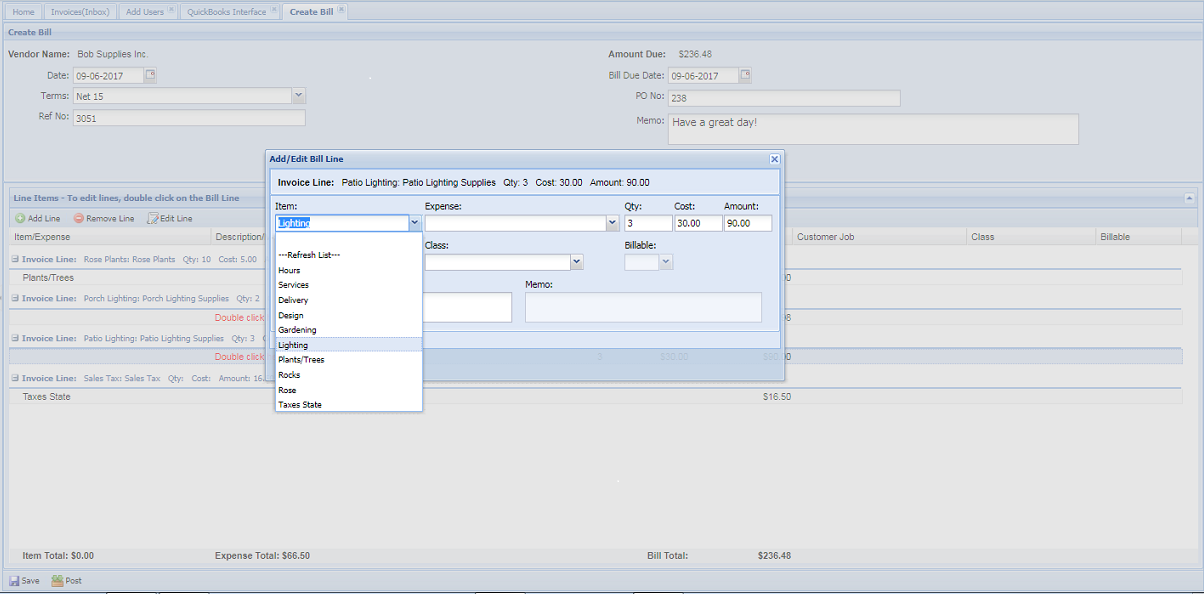
After mapping, invoices are posted as bills.
Automatic Mapping – When vendor sends a new Invoice with same item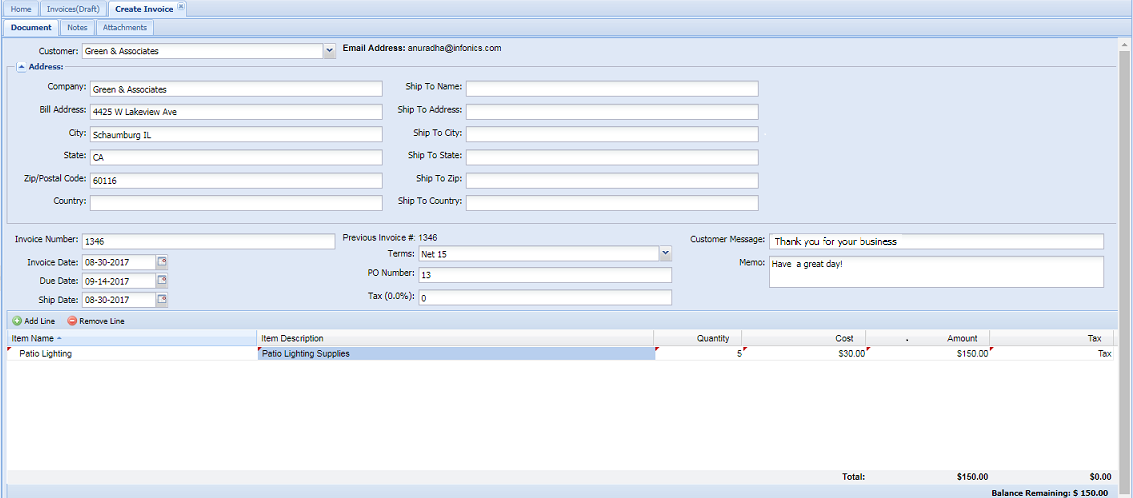 And you try to create the bill, the system automatically maps the Invoice lines to Bill Lines for Patio Lighting (in Invoice) to Lighting (in Bill).
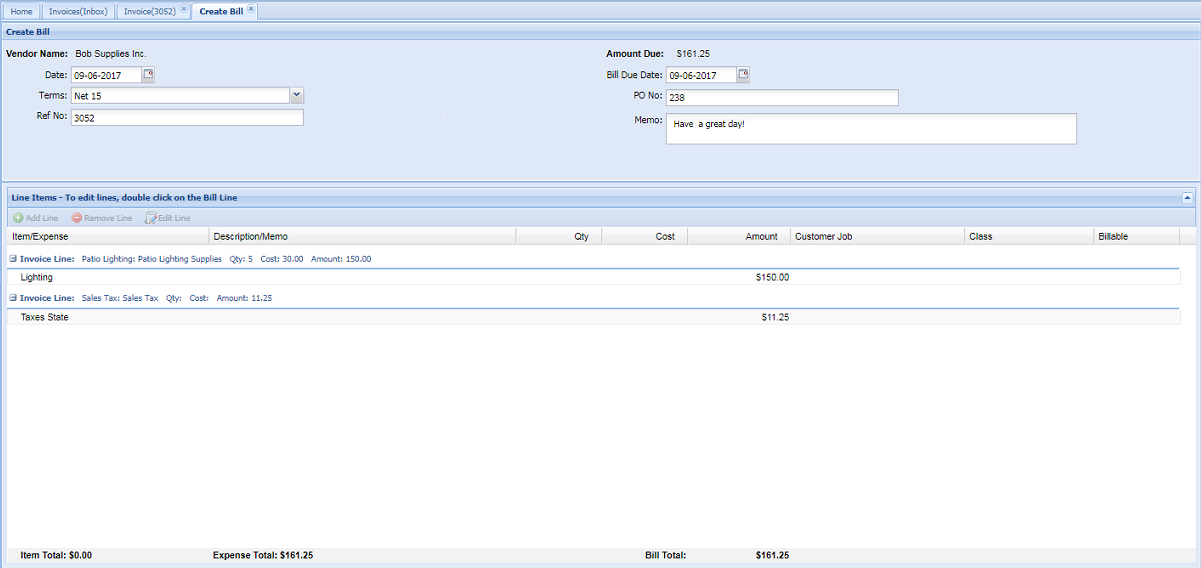
The invoice can be posted as bills, with no data entry.
In summary,
- Vendors creates invoices online.
- Attaches any supporting documents
- Sends the invoices
- You will post invoices as bills to QuickBooks, with automatic mapping of invoice line items to bill line items.
Notes:
- InLattice also provides a “Bulk Posting” feature which uses the automatic mapping logic and allows posting of multiple vendor invoices with a single click that can save a lot of time and effort.
- Also, invoices can be received by the manager and sent account staff, after the approval by the manager.
For additional support, please contact us at support@inlattice.com
Vendor Payments ACH/NACHA for QuickBooks Online
Stop Writing Checks – Make Direct Deposits to Your Vendors
Make Payments to Vendors by Direct Deposits using ACH – NACHA file
InLattice allows you to create NACHA file required for banks to process ACH transactions.
Provide Online Access to payment details Provide payment history to Vendors
The process includes registration, one time setup of vendor accounts with bank information, importing bill payments info from QuickBooks and creating NACHA file.The ACH/NACHA file created by InLattice, needs to be submitted by you, to your bank for further processing. Please contact your bank for more information on requirements for processing NACHA file.
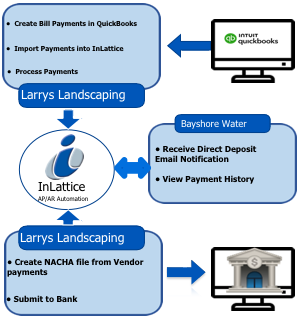
- If you have QuickBooks Online account already, go to step Register with InLattice. Otherwise, register your QuickBooks Online account
- After registration, login to your QuickBooks Online account and create your company.


- Add customer and vendor in your QuickBooks Online company.
- Register with InLattice.
- When you login first time to InLattice, the screen shown below gives the option to link your InLattice account with your QuickBooks Online account.

- If you have not logged in to QuickBooks Online account, you will be prompted to login and select the company.

- After successful login, you will be asked to authorize the connection of your QuickBooks Online account with your InLattice account.

- After authorization, your QuickBooks Online account connection data is saved with Inlattice.

- Click on OK, you will be redirected to your InLattice account

- Upload QuickBooks Vendor List – This can be done using InLattice > Settings > QuickBooks Interface > Refresh Vendor list option.
- Set up ACH Payment Gateway Data – You need to have an ACH account with the Bank. This information is entered in Settings > Setup Payment Gateway > Add/Edit ACH Payment gateway option
- You will have the multiple options for creating NACHA file. Select appropriate options.
- If you want to maintain (Add/Edit) Vendor Banking information, Select Yes in “Do you want to setup vendor banking information?” Otherwise for testing purpose, you will be required to login as a vendor to enter this information.
- Select Balanced/Unbalanced file option based on your bank’s requirements
- Enter other data provided by the bank.
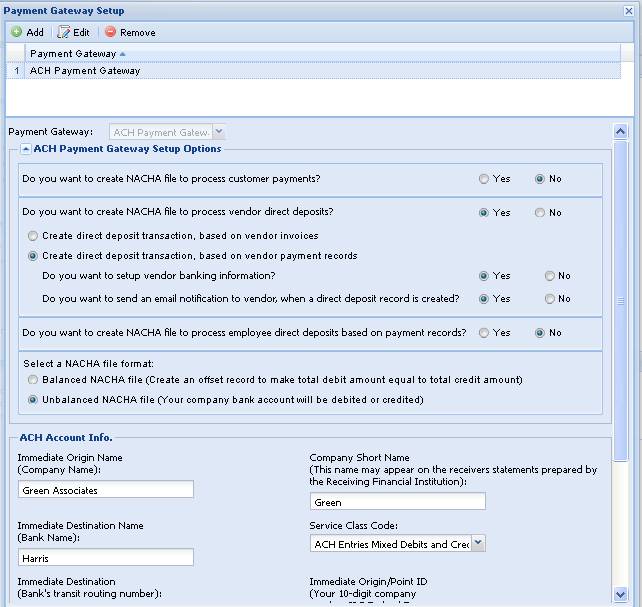
- Setup Vendor Accounts in InLattice – Go to Settings > Add users to add vendor accounts to InLattice. Based on your set up, you can also enter vendor bank information here. You will receive email notification with customer userid and password. (InLattice Support Team can set up user accounts, after the vendor list is uploaded to InLattice)
- Set Up Vendor Bank account info – Either you can do as part of step 12 or you need to login to vendor account to update this information.
- Enter Invoice Extract Begin Date – Go to Settings > QuickBooks Interface > Enter Invoice Extract Begin Date and enter a date.
- Upload QuickBooks Vendor List
- Setup New Vendor Accounts in InLattice.
- Set Up Vendor Bank account info

Whenever new vendor added to QuickBooks,
Use Settings > Application Settings screen to enable/disable various features of InLattice, setup user preference and banners, header images etc.
- Create Bill Payments for the vendors in QuickBooks.
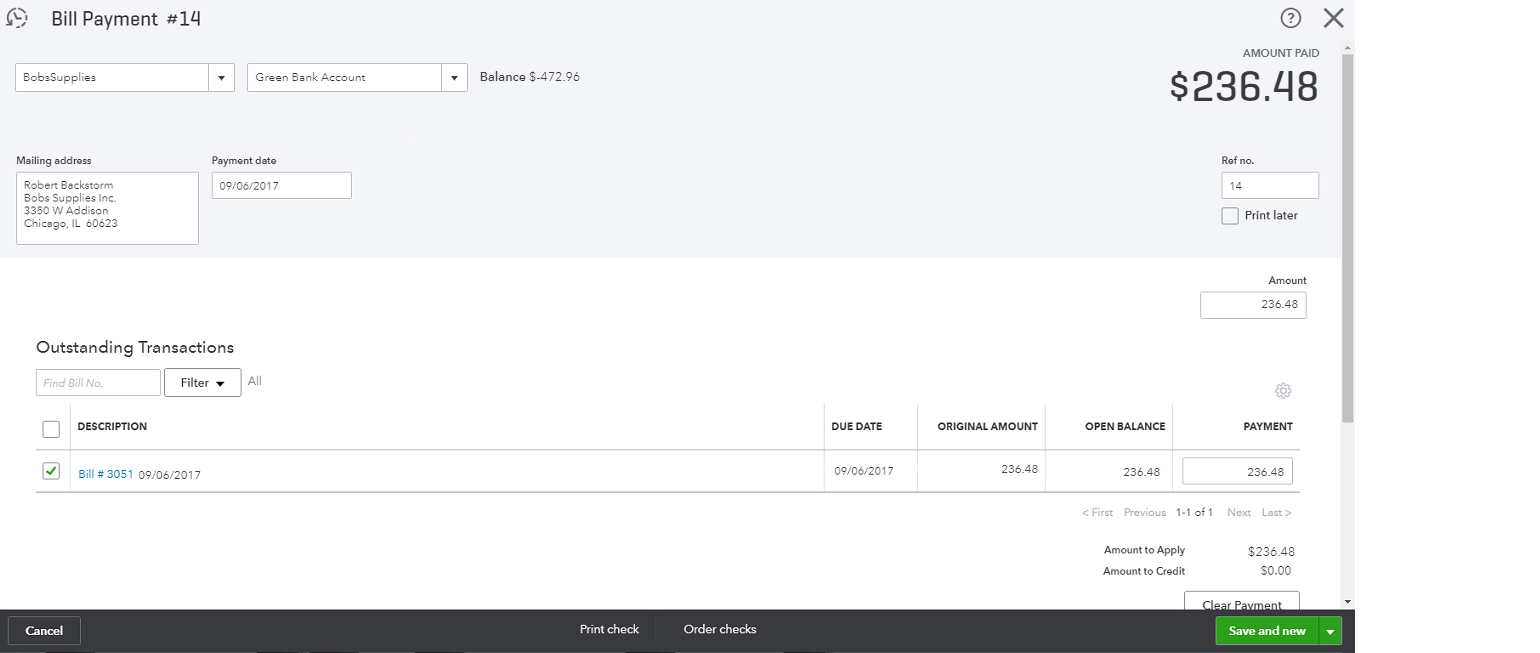
- Login to InLattice account
- Click on Import > Bill Payments
- All payments made in QuickBooks since last import will be uploaded to InLattice > Bill Payments > Draft folder. You will be directed to Bill Payments > Draft folder.

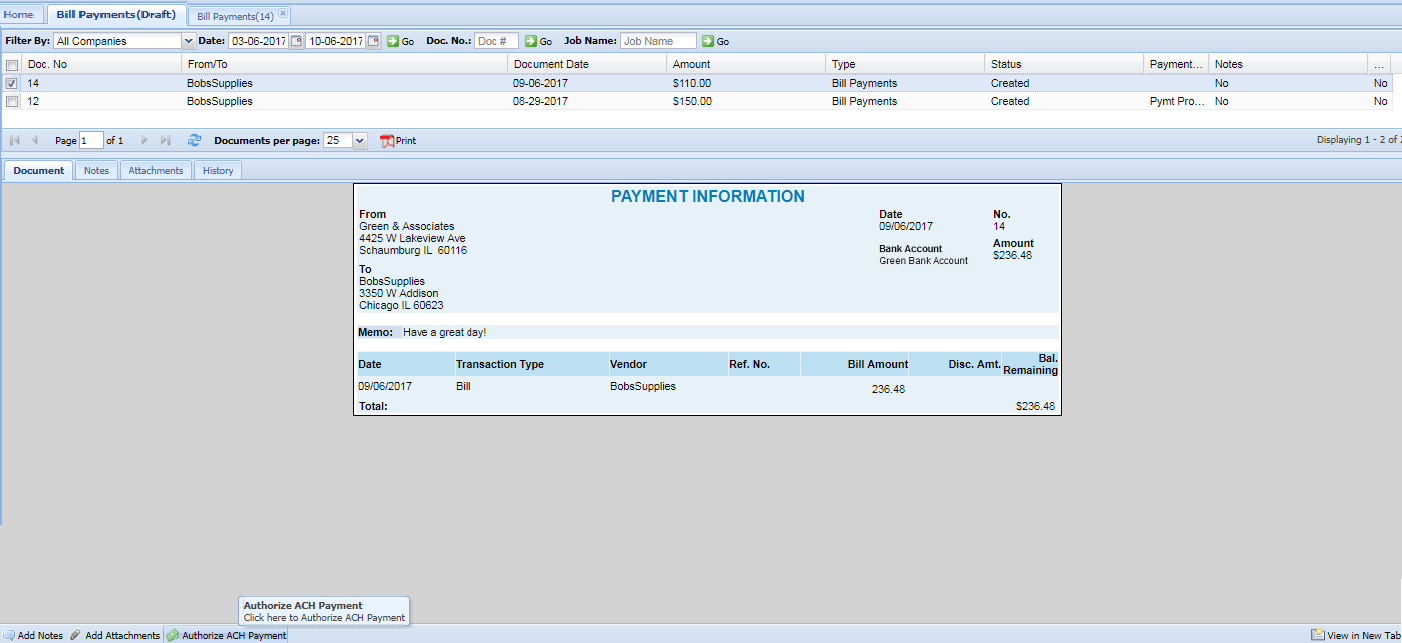
- You can authorize all payments by selecting all payments in draft folder and clicking on Authorize ACH payment.
- Click on ACH NACHA file button and click on Create File button. You will be directed to the file download screen. Vendors will receive an email notification, informing them about the payment, if email notification option is enabled.
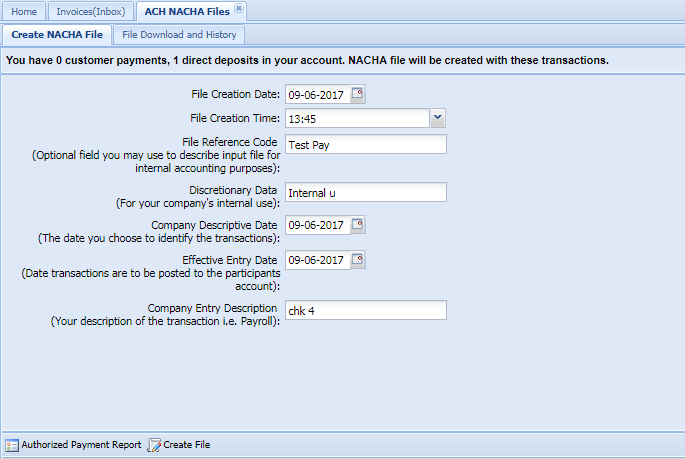

Direct Deposit Email Notification
|
- Download the file most recent ACH NACHA file.

- Send the NACHA file to Bank as per your bank’s guidelines.
- You can also send all payment info to Vendors. Vendors will receive an email with a link to payment document. Vendors can access these documents online for two years.

|
- If you do not want to send the payment details to Vendors, you can delete the rows from the draft folder.
For additional support, please contact us at support@inlattice.com
Employee Payments ACH/NACHA
Stop Writing Checks – Make Direct Deposits to Your Employees
Process Employee Direct Deposits using ACH – NACHA file
InLattice allows you to create NACHA file required for banks to process ACH transactions
The process includes registration, one time setup of employee accounts with bank information, importing employee check payments info from QuickBooks and creating NACHA file.The ACH/NACHA file created by InLattice, needs to be submitted by you, to your bank for further processing. Please contact your bank for more information on requirements for processing NACHA file.
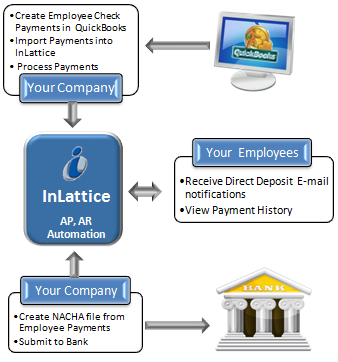
- Register with InLattice.
- Download and install the free QuickBooks Web Connector file- When you login first time, the below screen gives the link to download QuickBooks Web Connector file.
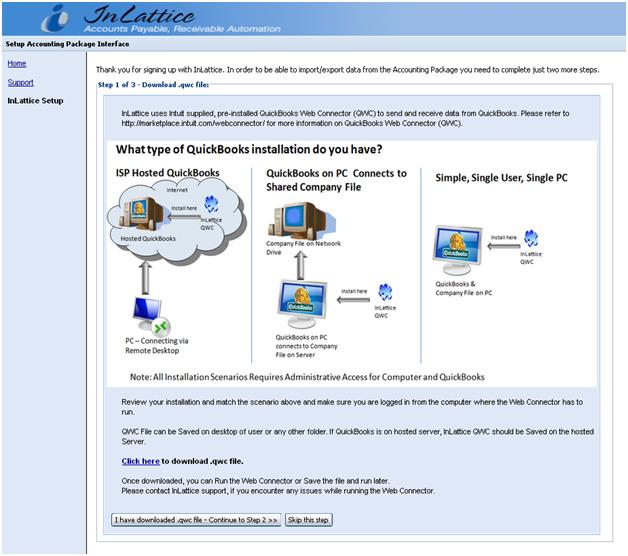
QuickBooks Web Connector file can also be downloaded from QuickBooks Interface screen after logging in.
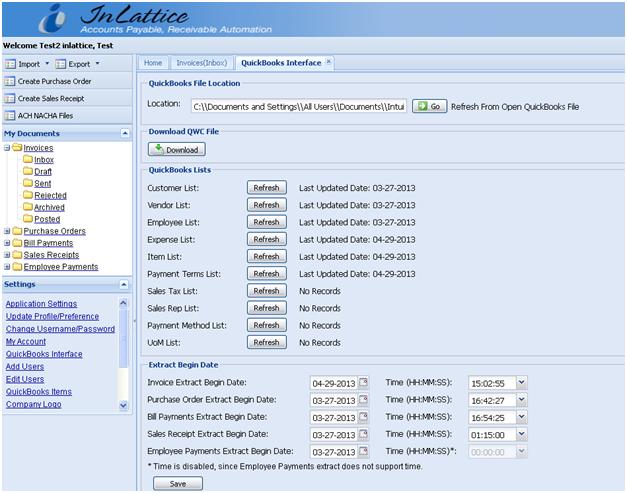
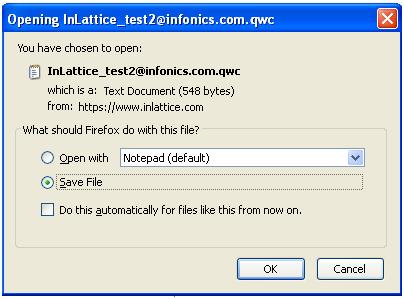
- Setup InLattice with the QuickBooks Web Connector – To begin this step, start QuickBooks on your computer and open your company file. Double click on the saved file InLattice_test2@infonics.com.qwc, the below window appears, click OK.
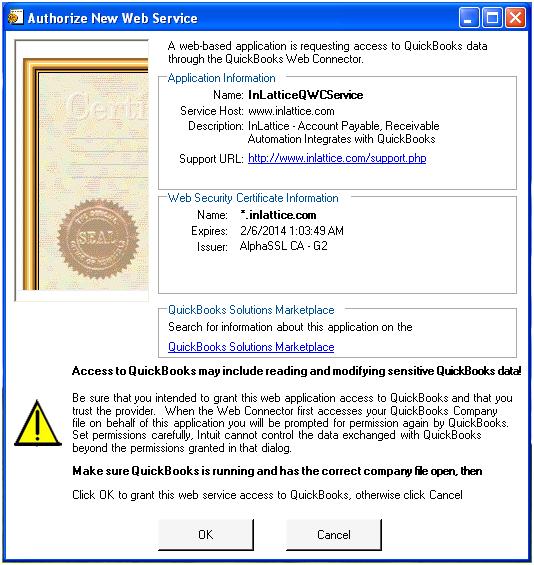
The QuickBooks Web Connector window will appear with the InLattice application listed.
- Run the QuickBooks Web Connector – To make InLattice active, follow these two steps
- Enter your Inlattice password into the password field. This is the password that you use when you log in to the Inlattice.
- Check the check box in the left column and click “Update Selected”.
Note: If you change your password in the Inlattice, you will need to change it in the QuickBooks Web Connector window.
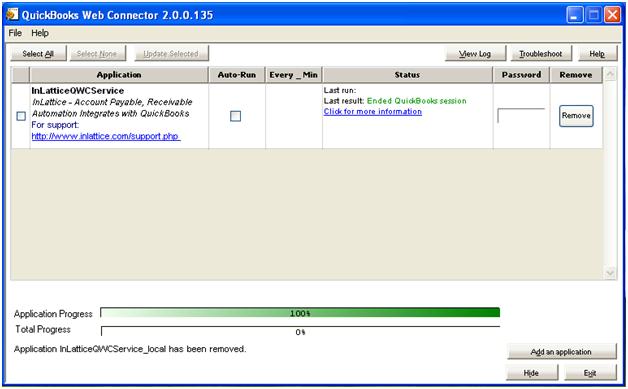
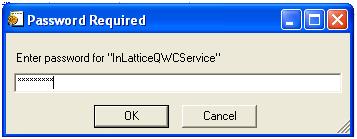
Password can be saved and no need of entering password every time when Web Connector is run.
- Upload QuickBooks Customer List – >This can be done using InLattice > Settings > QuickBooks Interface > Refresh Customer list option, Run Web Connector.
- Set up ACH Payment Gateway Data – You need to have an ACH account with the Bank. This information is entered in Settings > Setup Payment Gateway > Add/Edit ACH Payment gateway option
- You will have the multiple options for creating NACHA file. Select appropriate options
- If you want to maintain (Add/Edit) Customer Banking information, Select Yes in “Do you want to setup customer banking information?” Otherwise for testing purpose, you will be required to login as a customer to enter this information.
- Select Balanced/Unbalanced file option based on your bank’s requirements
- Enter other data provided by the bank.
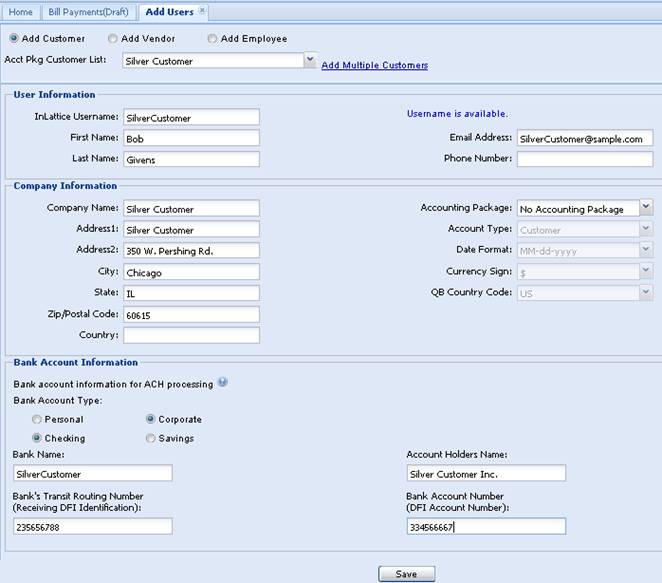
- Setup Customer Accounts in InLattice – Go to Settings > Add users to add customer accounts to InLattice. Based on your set up, you can also enter customer bank information here. You will receive email notification with customer userid and password. (InLattice Support Team can set up user accounts, after the customer list is uploaded to InLattice)
- Set Up Customer Bank account info – Either you can do as part of step 7 or you need to login to customer account to update this information.
- Enter Invoice Extract Begin Date – Go to Settings > QuickBooks Interface > Enter Invoice Extract Begin Date and enter a date.
Whenever new customers added to QuickBooks,
- Upload QuickBooks Customer List
- Setup New Customer Accounts in InLattice.
- Set Up Customer Bank account info
Use Settings > Application Settings screen to enable/disable various features of InLattice, setup user preference and banners, header images etc.
- Create Invoices for the customers in QuickBooks.

- Login to InLattice account
- Click on Import > Invoices
- Run Web Connector
- All payments made in QuickBooks since last import will be uploaded to InLattice > Employee Payments > Draft folder. You will be directed to Employee Payments > Draft folder.

- You can authorize all payments by selecting all payments in draft folder and clicking on Authorize ACH payment..
- Click on ACH NACHA file button and click on Create File button. You will be directed to the file download screen. Employees will receive an email notification, informing them about the payment, if email notification option is enabled

 |
- Download the file most recent ACH NACHA file.

- Send the NACHA file to Bank as per your bank’s guidelines.
- You can also send all payment info to Employees. Employees will receive an email with a link to payment document. Employees can access these documents online for two years.
 |
- If you do not want to send the payment details to employees, you can delete the rows from the draft folder
For additional support, please contact us at support@inlattice.com
Customer Account Center for QuickBooks Desktop
Go Beyond Online Invoicing
Provide online access to Customer Invoices and Receive Payments
The process includes registration, one time setup of customer accounts, importing invoices and providing online access to customers.

- Register with InLattice.
- Download and install the free QuickBooks Web Connector file- When you login first time, the below screen gives the link to download QuickBooks Web Connector file.


QuickBooks Web Connector file can also be downloaded from QuickBooks Interface screen after logging in.

- Setup InLattice with the QuickBooks Web Connector – To begin this step, start QuickBooks on your computer and open your company file. Double click on the saved file InLattice_test2@infonics.com.qwc, the below window appears, click OK.

The QuickBooks Web Connector window will appear with the InLattice application listed.
- Run the QuickBooks Web Connector – To make InLattice active, follow these two steps
- Enter your Inlattice password into the password field. This is the password that you use when you log in to the Inlattice.
- Check the check box in the left column and click “Update Selected”.
Note: If you change your password in the Inlattice, you will need to change it in the QuickBooks Web Connector window.


Password can be saved and no need of entering password every time when Web Connector is run.
- Upload QuickBooks Customer List – This can be done using InLattice > Settings > QuickBooks Interface > Refresh Customer list option, Run Web Connector.
- Setup Customer Accounts in InLattice – Go to Settings > Add users to add customer accounts to InLattice. You will receive email notification with customer userid and password. (InLattice Support Team can set up user accounts, after the customer list is uploaded to InLattice)

- Enter Invoice Extract Begin Date – Go to Settings > QuickBooks Interface >Enter Invoice Extract Begin Date and enter a date.
- Upload QuickBooks Customer List
- Setup New Customer Accounts in InLattice
- Set Up Customer Bank account info (optional)
Use Settings > Application Settings screen to enable/disable various features of InLattice, setup user preference and banners, header images etc.
- Create Invoices for the customers in QuickBooks.
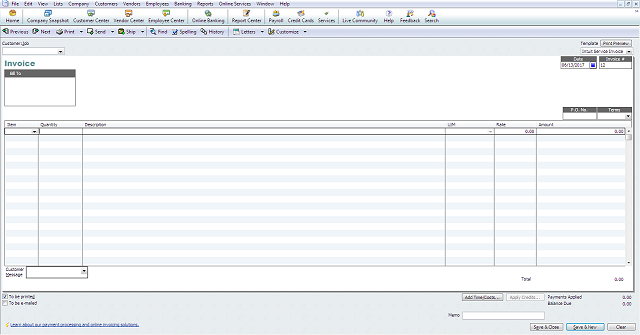
- Login to InLattice account
- Click on Import > Invoices
- Run Web Connector
- All invoices created in QuickBooks since last import will be uploaded to InLattice > Invoices > Draft folder. You will be directed to Invoices > Draft folder

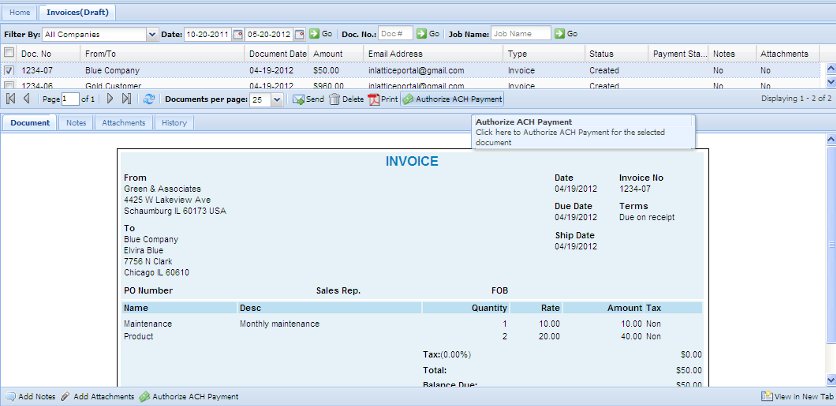
- Attach any supporting documents
- Send the invoices to customer.
- Customers will get an email notification.
- Customer can click on the link to view the
- Export Payments to QuickBooks. Invoices will be marked as paid, if online payment is enabled.
Customer viewing invoices:
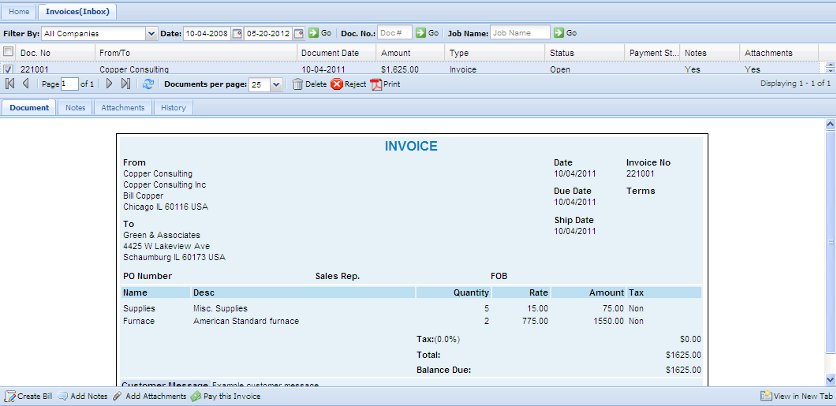
- Customer will receive the email alert
- Customer can click on the email link to view the invoice.
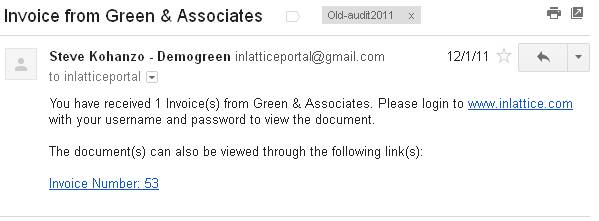
- Also, by logging into the online portal, customer can view all invoices received.
- If online payment option is set up, customer can authorize payments online.
For additional support, please contact us at support@inlattice.com
Customer Payment ACH/NACHA for QuickBooks Desktop
Get Paid Faster, Easier & Cheaper
Receive Customer Payments using ACH – NACHA file .
InLattice allows you to create NACHA file required for banks to process ACH transactions.
The process includes registration, one time setup of customer accounts with bank information, importing invoices, creating NACHA file and providing online access to customers.The ACH/NACHA file created by InLattice, needs to be submitted by you, to your bank for further processing. Please contact your bank for more information on requirements for processing NACHA file.

- Register with InLattice.
- Download and install the free QuickBooks Web Connector file- When you login first time, the below screen gives the link to download QuickBooks Web Connector file.


QuickBooks Web Connector file can also be downloaded from QuickBooks Interface screen after logging in.

- Setup InLattice with the QuickBooks Web Connector – To begin this step, start QuickBooks on your computer and open your company file. Double click on the saved file InLattice_test2@infonics.com.qwc, the below window appears, click OK.

The QuickBooks Web Connector window will appear with the InLattice application listed.
- Run the QuickBooks Web Connector – To make InLattice active, follow these two steps
- Enter your Inlattice password into the password field. This is the password that you use when you log in to the Inlattice.
- Check the check box in the left column and click “Update Selected”.
Note: If you change your password in the Inlattice, you will need to change it in the QuickBooks Web Connector window.


Password can be saved and no need of entering password every time when Web Connector is run.
- Upload QuickBooks Customer List – This can be done using InLattice > Settings > QuickBooks Interface > Refresh Customer list option, Run Web Connector.
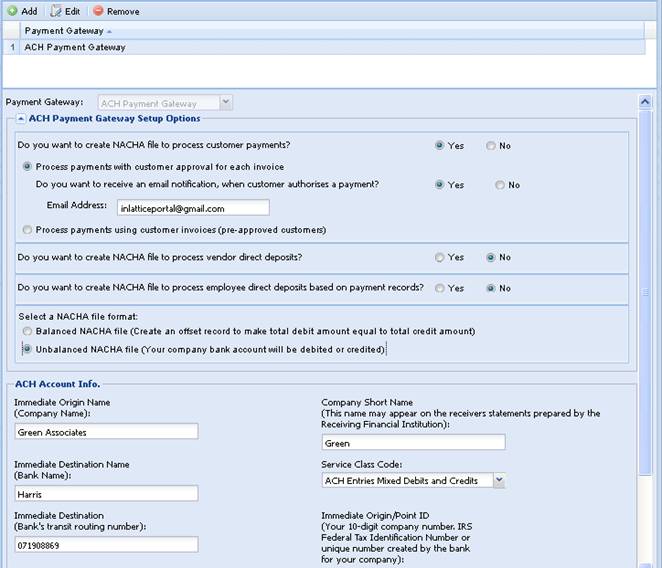
- Set up ACH Payment Gateway Data – You need to have an ACH account with the Bank. This information is entered in Settings > Setup Payment Gateway > Add/Edit ACH Payment gateway option
- You will have the multiple options for creating NACHA file. Select appropriate options
- If you want to maintain (Add/Edit) Customer Banking information, Select Yes in “Do you want to setup customer banking information?” Otherwise for testing purpose, you will be required to login as a customer to enter this information.
- Select Balanced/Unbalanced file option based on your bank’s requirements
- Enter other data provided by the bank.
- Setup Customer Accounts in InLattice – Go to Settings > Add users to add customer accounts to InLattice. Based on your set up, you can also enter customer bank information here. You will receive email notification with customer userid and password. (InLattice Support Team can set up user accounts, after the customer list is uploaded to InLattice)
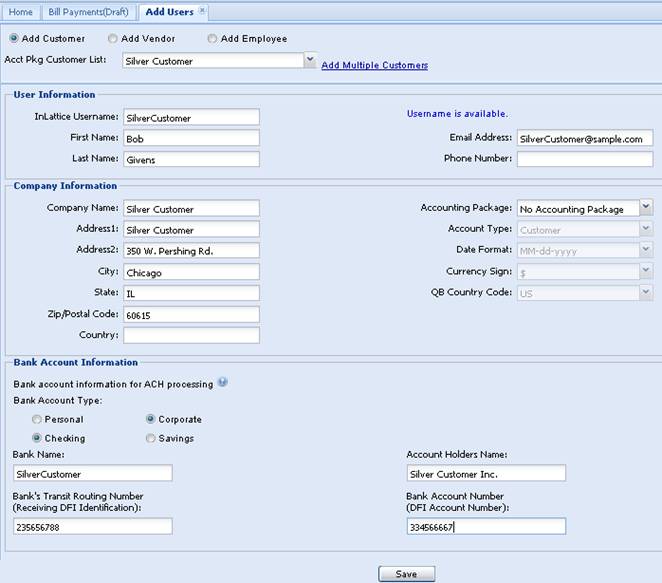
- Set Up Customer Bank account info – Either you can do as part of step 7 or you need to login to customer account to update this information.
- Enter Invoice Extract Begin Date – Go to Settings > QuickBooks Interface > Enter Invoice Extract Begin Date and enter a date.
Whenever new customers added to QuickBooks,
- Upload QuickBooks Customer List
- Setup New Customer Accounts in InLattice.
- Set Up Customer Bank account info
Use Settings > Application Settings screen to enable/disable various features of InLattice, setup user preference and banners, header images etc.
- Create Invoices for the customers in QuickBooks.

- Login to InLattice account
- Click on Import > Invoices
- Run Web Connector
- All invoices created in QuickBooks since last import will be uploaded to InLattice > Invoices > Draft folder. You will be directed to Invoices > Draft folder


Pre-Approved customers
- You can authorize all payments by selecting all payments in draft folder and clicking on Authorize ACH payment.
With Online Payment Authorization by Customer
- Send the invoices to customer.
- Customers will get an email notification.
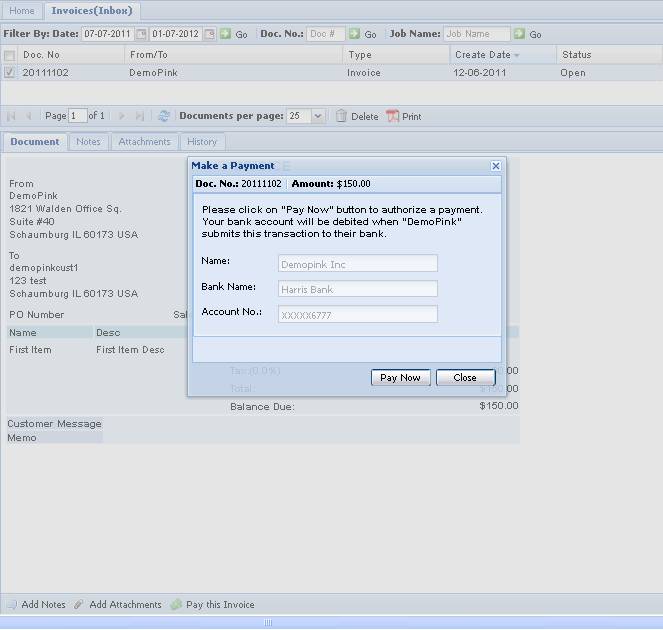
- Customer can click on the link to view the invoice and click on “Pay this invoice” to authorize payments
- When customer makes a payment, you will get an email notification
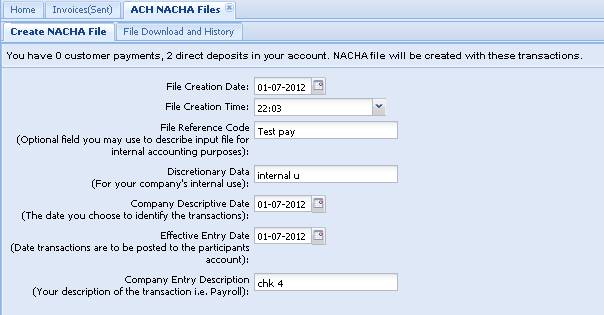
- Click on ACH NACHA file button and click on Create File button. You will be directed to the file download screen. Customers will receive an email notification, informing them about the debit to their account, if email notification option is enabled.

|
- Download the file most recent ACH NACHA file .

- Send the NACHA file to Bank as per your bank’s guidelines.
- Export payments into QuickBooks.
- Run Web Connector. All paid invoices will be sent to QuickBooks.
Export Payments to QuickBooks. Invoices will be marked as paid
For additional support, please contact us at support@inlattice.com
Vendor Portal for QuickBooks Desktop
Simplify & Streamline Your AP – Eliminate Data Entry
Receive Vendor Invoices and Post it as Bills in QuickBooks
The process includes registration, one time setup of vendor accounts, receiving vendor invoices and posting bills to QuickBooks.

- Register with InLattice.
- Download and install the free QuickBooks Web Connector file- When you login first time, the below screen gives the link to download QuickBooks Web Connector file.

On click of “click here” your browser’s file download dialog box is brought up. When this box appears, choose “Ok”, and put the file somewhere on your computer where you can easily find it, such as on your desktop. This is the InLattice application file.

QuickBooks Web Connector file can also be downloaded from QuickBooks Interface screen after logging in.

- Setup InLattice with the QuickBooks Web Connector – To begin this step, start QuickBooks on your computer and open your company file. Double click on the saved file InLattice_test2@infonics.com.qwc, the below window appears, click OK.

The QuickBooks Web Connector window will appear with the InLattice application listed.
- Run the QuickBooks Web Connector – To make InLattice active, follow these two steps
- Enter your Inlattice password into the password field. This is the password that you use when you log in to the Inlattice.
- Check the check box in the left column and click “Update Selected”.
Note: If you change your password in the Inlattice, you will need to change it in the QuickBooks Web Connector window.


Password can be saved and no need of entering password every time when Web Connector is run.
- Upload QuickBooks Vendor List – This can be done using InLattice > Settings > QuickBooks Interface > Refresh Vendor list option
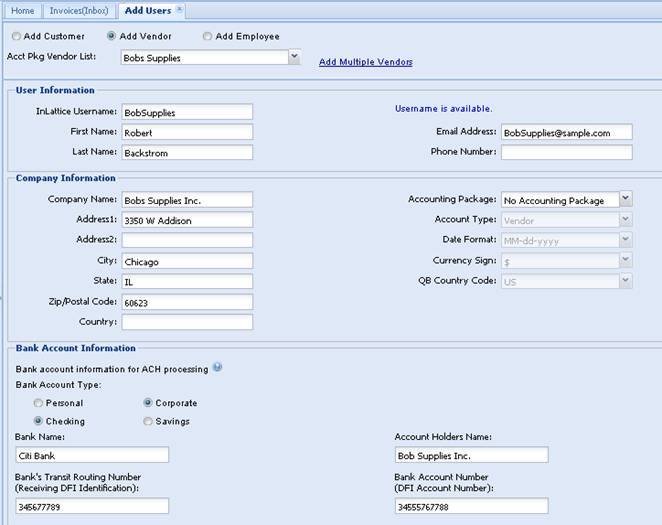
- Setup Vendor Accounts in InLattice – Go to Settings >Go to Settings > Add users to add vendor accounts to InLattice. Based on your set up, you can also enter vendor bank information here.
- Upload QuickBooks Vendor List
- Setup New Vendor Accounts in InLattice
- Send Vendor Login information to vendors – You will receive email notification with vendor userid and password. (InLattice Support Team can set up user accounts, after the vendor list is uploaded to InLattice)
Whenever new vendors added to QuickBooks,
If you receive a lot of invoices from Vendors, InLattice can save you quite a bit of time by automating the Bill creation process. As you use InLattice to Post bills from Vendor Invoices, InLattice will learn the mapping that you use from Invoice lines to Bill Lines. Subsequent bills created from same Vendor will be automatically mapped using the previously learned mapping. So, after creating a few bills, new bills can be posted just with a click of a button.
Here’s a quick ‘how to’ Guide
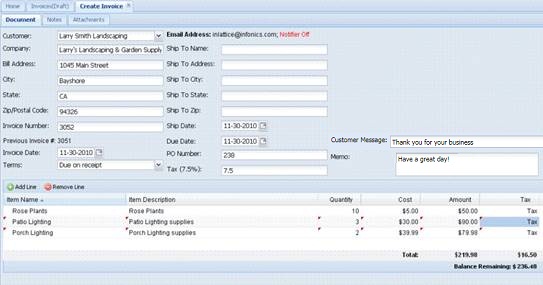
Vendor Creates an Invoice – with Rose Plants, Patio Lighting and Porch Lighting as Line Items.
Create Bill – Once this Invoice is received, you will create a Bill, InLattice will automatically map the known items in the Invoice line to Bill Line. Notice that Rose Plants is already mapped however Porch Lighting and Patio Lighting is not mapped since this is the first Invoice from this Vendor using that item.
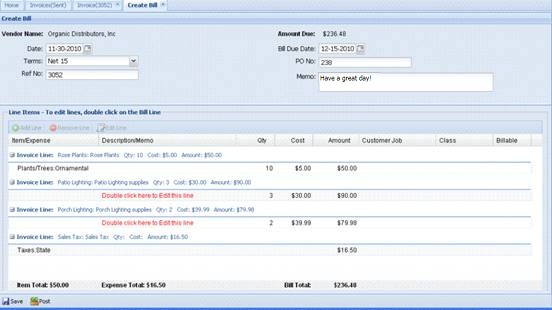 Mapping – You can double clicks on the unmapped Items and manually map them for this Invoice
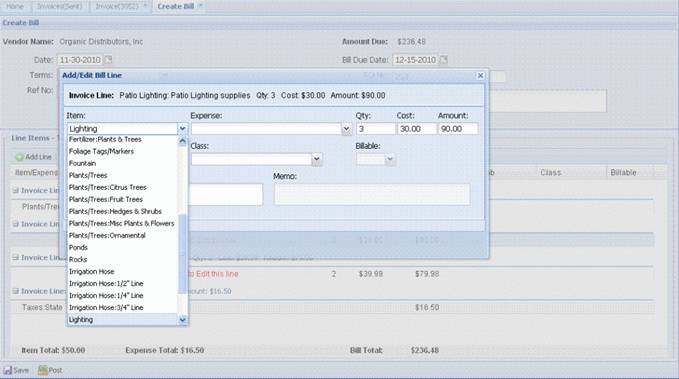
After mapping, invoices are posted as bills.
Automatic Mapping – When vendor sends a new Invoice with same item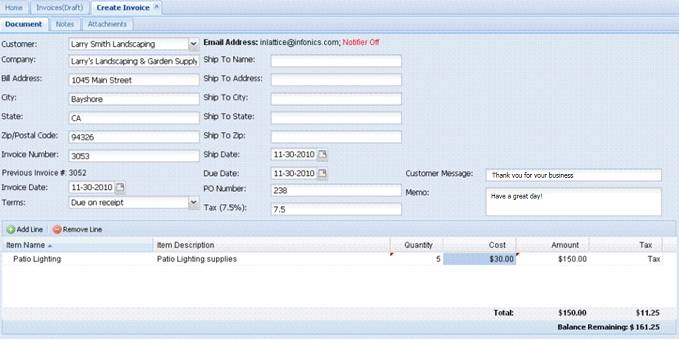 And you try to create the bill, the system automatically maps the Invoice lines to Bill Lines for Patio Lighting (in Invoice) to Lighting (in Bill).
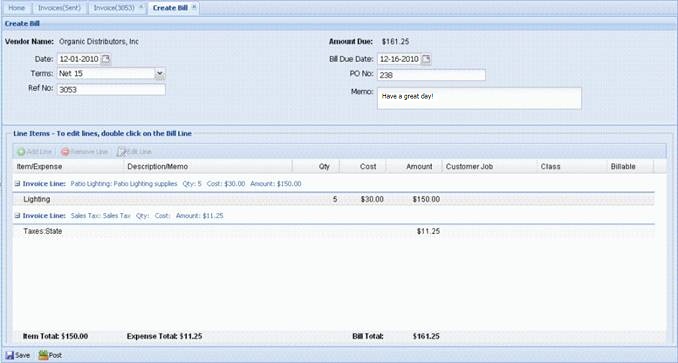
The invoice can be posted as bills, with no data entry.
In summary,
- Vendors creates invoices online.
- Attaches any supporting documents
- Sends the invoices
- You will post invoices as bills to QuickBooks, with automatic mapping of invoice line items to bill line items.
Notes:
- InLattice also provides a “Bulk Posting” feature which uses the automatic mapping logic and allows posting of multiple vendor invoices with a single click that can save a lot of time and effort.
- Also, invoices can be received by the manager and sent account staff, after the approval by the manager.
For additional support, please contact us at support@inlattice.com
Vendor Payments ACH/NACHA for QuickBooks Desktop
Stop Writing Checks – Make Direct Deposits to Your Vendors
Make Payments to Vendors by Direct Deposits using ACH – NACHA file
InLattice allows you to create NACHA file required for banks to process ACH transactions.
Provide Online Access to payment details Provide payment history to Vendors
The process includes registration, one time setup of vendor accounts with bank information, importing bill payments info from QuickBooks and creating NACHA file.The ACH/NACHA file created by InLattice, needs to be submitted by you, to your bank for further processing. Please contact your bank for more information on requirements for processing NACHA file.

- Register with InLattice.
- Download and install the free QuickBooks Web Connector file- When you login first time, the below screen gives the link to download QuickBooks Web Connector file.

On click of “click here” your browser’s file download dialog box is brought up. When this box appears, choose “Ok”, and put the file somewhere on your computer where you can easily find it, such as on your desktop. This is the InLattice application file.

QuickBooks Web Connector file can also be downloaded from QuickBooks Interface screen after logging in.

- Setup InLattice with the QuickBooks Web Connector – To begin this step, start QuickBooks on your computer and open your company file. Double click on the saved file InLattice_test2@infonics.com.qwc, the below window appears, click OK.

The QuickBooks Web Connector window will appear with the InLattice application listed.
- Run the QuickBooks Web Connector – To make InLattice active, follow these two steps
- Enter your Inlattice password into the password field. This is the password that you use when you log in to the Inlattice.
- Check the check box in the left column and click “Update Selected”.
Note: If you change your password in the Inlattice, you will need to change it in the QuickBooks Web Connector window.


Password can be saved and no need of entering password every time when Web Connector is run.
- Upload QuickBooks Vendor List – This can be done using InLattice > Settings > QuickBooks Interface > Refresh Vendor list option
- Set up ACH Payment Gateway Data – You need to have an ACH account with the Bank. This information is entered in Settings > Setup Payment Gateway > Add/Edit ACH Payment gateway option
- You will have the multiple options for creating NACHA file. Select appropriate options.
- If you want to maintain (Add/Edit) Vendor Banking information, Select Yes in “Do you want to setup vendor banking information?” Otherwise for testing purpose, you will be required to login as a vendor to enter this information.
- Select Balanced/Unbalanced file option based on your bank’s requirements
- Enter other data provided by the bank.

- Setup Vendor Accounts in InLattice – Go to Settings > Add users to add vendor accounts to InLattice. Based on your set up, you can also enter vendor bank information here. You will receive email notification with vendor userid and password. (InLattice Support Team can set up user accounts, after the vendor list is uploaded to InLattice).
- Set Up Vendor Bank account info – Either you can do as part of step 5 or you need to login to vendor account to update this information.

- Enter Bill Payments Extract Begin Date – Go to Settings > QuickBooks Interface > Enter Bill Payments Extract Begin Date and enter a date.
Whenever new vendors added to QuickBooks,
- Upload QuickBooks Vendor List.
- Setup New Vendor Accounts in InLattice.
- Set Up Vendor Bank account info
Use Settings > Application Settings screen to enable/disable various features of InLattice, setup user preference and banners, header images etc.
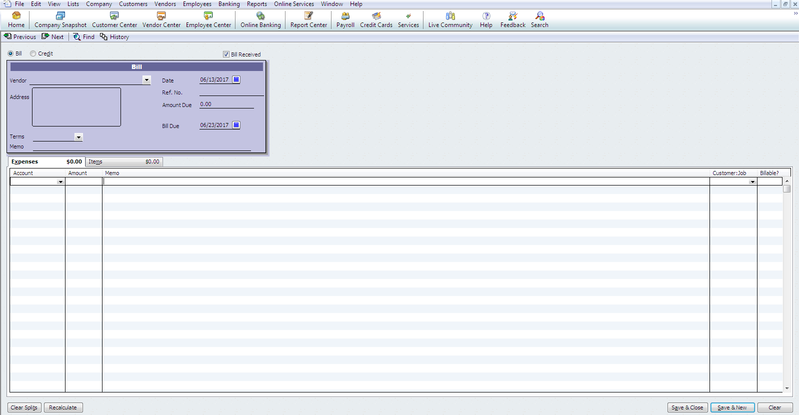
- Create Bill Payments for the vendors in QuickBooks.
- Login to InLattice account
- Click on Import > Bill Payments

- Run Web Connector.
- All payments made in QuickBooks since last import will be uploaded to InLattice > Bill Payments > Draft folder. You will be directed to Bill Payments > Draft folder.
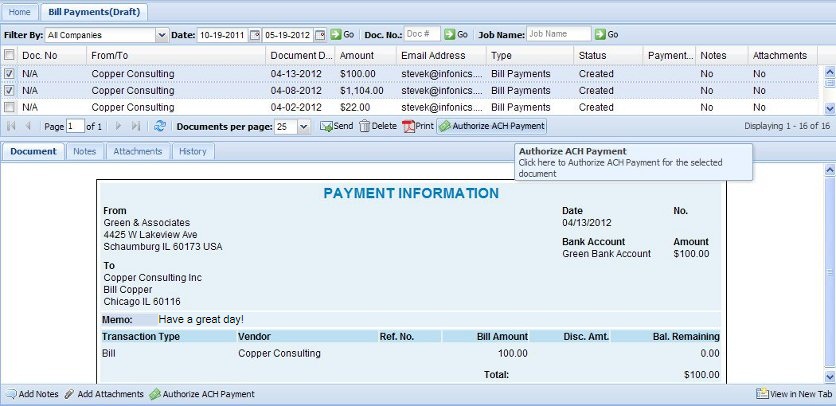
- You can authorize all payments by selecting all payments in draft folder and clicking on Authorize ACH payment.
- Click on ACH NACHA file button and click on Create File button. You will be directed to the file download screen. Vendors will receive an email notification, informing them about the payment, if email notification option is enabled.
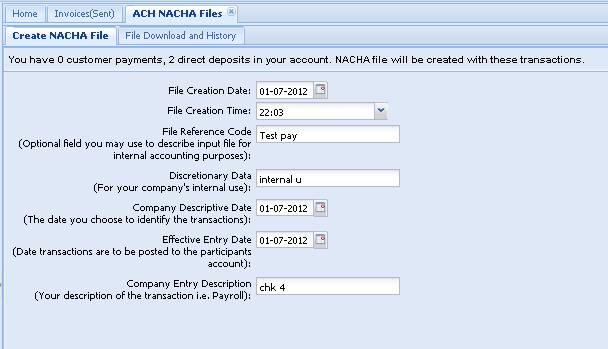

Direct Deposit Email Notification |
- Download the file most recent ACH NACHA file.

- Send the NACHA file to Bank as per your bank’s guidelines.
- You can also send all payment info to Vendors. Vendors will receive an email with a link to payment document. Vendors can access these documents online for two years.

|
- If you do not want to send the payment details to Vendors, you can delete the rows from the draft folder.
For additional support, please contact us at support@inlattice.com
Employee Payments ACH/NACHA for QuickBoks Desktop
Stop Writing Checks
Make direct deposits to your employees using ACH/NACHA file
Send automatic payment notifications to employees
The process includes registration, one time setup of employee accounts with bank information, importing employee check payments info from QuickBooks and creating NACHA file.The ACH/NACHA file created by InLattice, needs to be submitted by you, to your bank for further processing. Please contact your bank for more information on requirements for processing NACHA file.
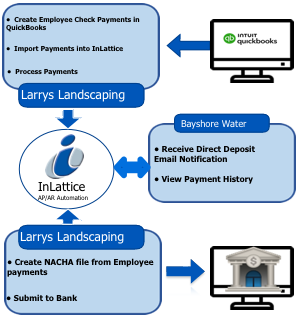
- Register with InLattice.
- Download and install the free QuickBooks Web Connector file- When you login first time, the below screen gives the link to download QuickBooks Web Connector file.


QuickBooks Web Connector file can also be downloaded from QuickBooks Interface screen after logging in.

- Setup InLattice with the QuickBooks Web Connector – To begin this step, start QuickBooks on your computer and open your company file. Double click on the saved file InLattice_test2@infonics.com.qwc, the below window appears, click OK.

The QuickBooks Web Connector window will appear with the InLattice application listed.
- Run the QuickBooks Web Connector – To make InLattice active, follow these two steps
- Enter your Inlattice password into the password field. This is the password that you use when you log in to the Inlattice.
- Check the check box in the left column and click “Update Selected”.
Note: If you change your password in the Inlattice, you will need to change it in the QuickBooks Web Connector window.


Password can be saved and no need of entering password every time when Web Connector is run.
- Upload QuickBooks Employee List – This can be done using InLattice > Settings > QuickBooks Interface > Refresh Employee list option
- Set up ACH Payment Gateway Data – You need to have an ACH account with the Bank. This information is entered in Settings > Setup Payment Gateway > Add/Edit ACH Payment gateway option
- You will have the multiple options for creating NACHA file. Select appropriate options
- If you want to maintain (Add/Edit) Employee Banking information, Select Yes in “Do you want to setup employee banking information?” Otherwise for testing purpose, you will be required to login as a employee to enter this information.
- Select Balanced/Unbalanced file option based on your bank’s requirements
- Enter other data provided by the bank.
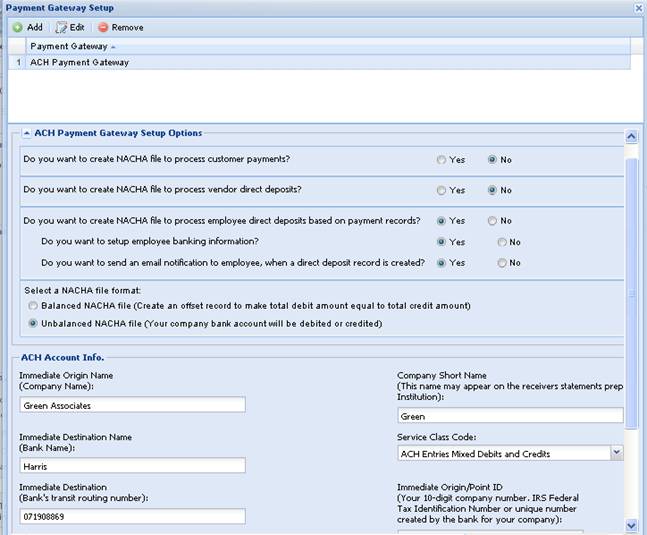
- Setup Employee Accounts in InLattice – Go to Settings > Add users to add employee accounts to InLattice. Based on your set up, you can also enter employee bank information here. You will receive email notification with employee userid and password. (InLattice Support Team can set up user accounts, after the employee list is uploaded to InLattice).
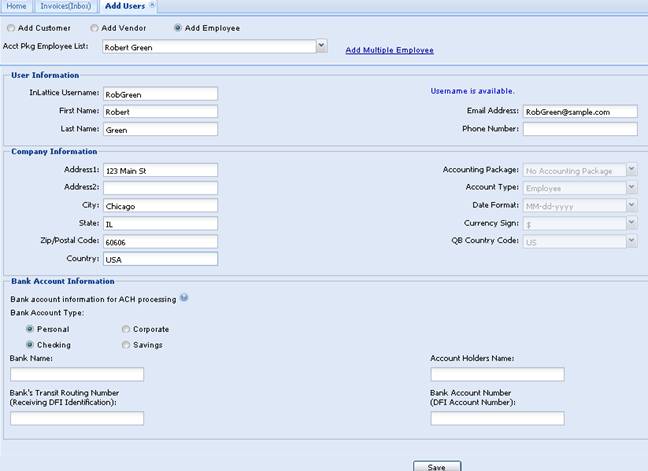
- Set Up Employee Bank account info – Either you can do as part of step 7 or you need to login to employee account to update this information.
- Enter Invoice Extract Begin Date – Go to Settings > QuickBooks Interface > Enter Invoice Extract Begin Date and enter a date.
Whenever new customers added to QuickBooks,
- Upload QuickBooks Customer List
- Setup New Customer Accounts in InLattice.
- Set Up Customer Bank account info
Use Settings > Application Settings screen to enable/disable various features of InLattice, setup user preference and banners, header images etc.
- Create Check Payments for the Employees in QuickBooks.
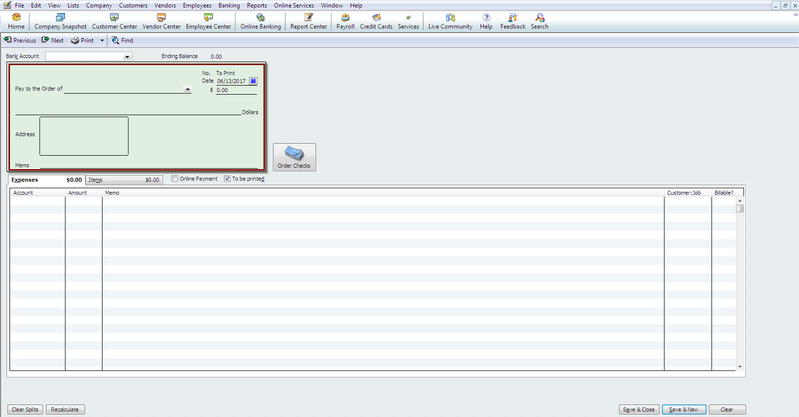
- Login to InLattice account
- Click on Import > Employee Payments
- Run Web Connector
- All payments made in QuickBooks since last import will be uploaded to InLattice > Employee Payments > Draft folder. You will be directed to Employee Payments > Draft folder.

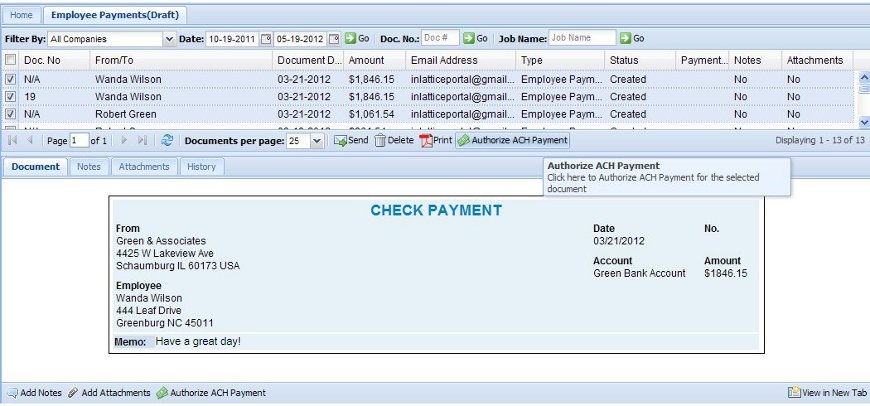
- You can authorize all payments by selecting all payments in draft folder and clicking on Authorize ACH payment..
- Click on ACH NACHA file button and click on Create File button. You will be directed to the file download screen. Employees will receive an email notification, informing them about the payment, if email notification option is enabled
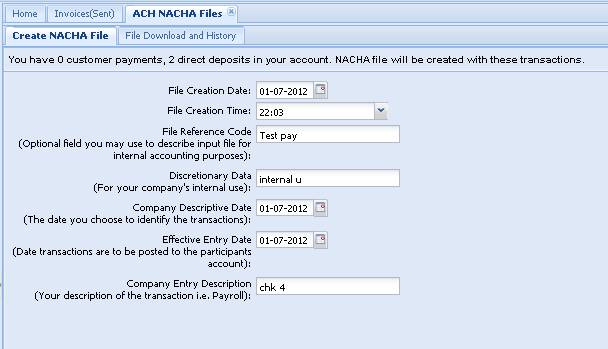

Direct Deposit Email Notification
|
- Download the file most recent ACH NACHA file.

- Send the NACHA file to Bank as per your bank’s guidelines.
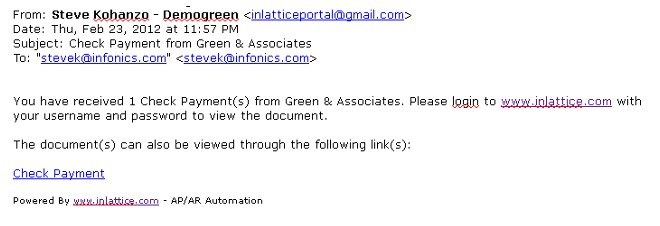
- You can also send all payment info to Employees. Employees will receive an email with a link to payment document. Employees can access these documents online for two years.
|
- If you do not want to send the payment details to employees, you can delete the rows from the draft folder
For additional support, please contact us at support@inlattice.com